
在第一部分中,我分享了如何在Hugging Face Spaces上使用ZeroGPU插槽部署DeepSeek-7B Chat,实现了极具性价比的推理(参考链接:https://medium.com/the-constellar-digital-technology-blog/geek-out-time-building-your-cheap-custom-chatbot-using-gradio-with-fine-tuned-models-on-hugging-53237b7c82fc)。
在第二部分,我们更进一步——深入微调DeepSeek-7B本身,并探索了RunPod和Cursor等平台如何开启了新的工作方式。
这不仅仅是一场微调的练习,更像是窥见了编程本身如何随着工具(如Cursor)而进化——这些工具能够执行、调试、并连接云端基础设施。
微调的各种方式(快速概览)
在动手之前,先快速了解一下当今常见的微调方法,有些轻量且经济实惠,有些则需要庞大的计算资源:
- 完整微调(Full Fine-Tuning):
训练基础模型的所有参数,极其昂贵且占用大量内存,通常不适合个人开发者或小型项目。 - 前缀微调(Prefix-Tuning):
只训练一小部分任务特定的向量(即“前缀”),基础模型保持冻结。 - 提示微调(Prompt-Tuning):
与前缀微调类似,但优化的是添加在输入提示前的虚拟token,适合简单任务。 - 低秩适配(LoRA):
通过在注意力层插入小型可训练矩阵,只需少量资源即可完成微调,即便是大型模型(如DeepSeek-7B)也适用。 - 量化低秩适配(QLoRA):
在LoRA基础上结合4位量化(4-bit quantization),极大降低了内存需求,使得用12GB至24GB VRAM的GPU就能微调超大模型如DeepSeek-7B或13B。
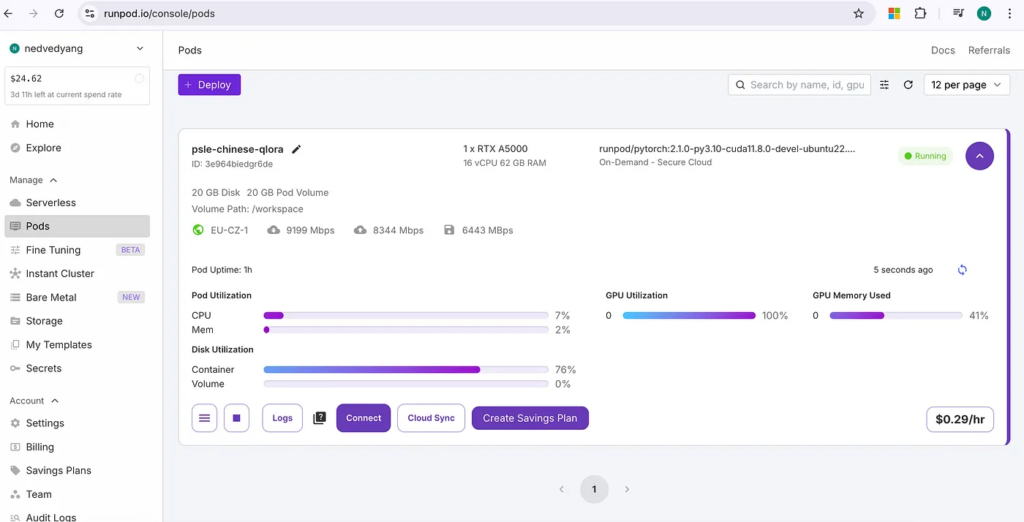
本次实验我特意选择了QLoRA,目标是以最便宜的方式微调大型模型。我尽量利用免费额度或极低价格的GPU,通过4位量化与QLoRA技术,在一块价格适中的RTX A5000 GPU上(每小时仅约0.29美元)完成了训练。这使得整个过程即便对个人开发者来说也变得可负担且实用。
起步:继续在Cursor上进行实验
在我之前的极客时光分享(https://medium.com/the-constellar-digital-technology-blog/geek-out-time-experiment-with-ai-powered-cursor-reflections-from-the-edge-1ec25bc4a884)中,我探讨了使用Cursor简化Hugging Face API调用和本地开发的过程。这次实验进一步拓宽了我的认知。
Cursor不仅是一个AI编程助手,更像是一个真正的“编程搭档”。我可以在同一环境中起草脚本、调试、优化提示词、连接Hugging Face,甚至生成完整工作流。
Cursor的深度集成让代码代理(Agent)可以执行命令、运行shell脚本、评估输出、进行自我批评并根据结果修正代码。
虽然自动化变得越来越强,但开发者仍然牢牢掌握决策权。这种互动既自然又充满力量感,而非全自动剥夺人的控制。
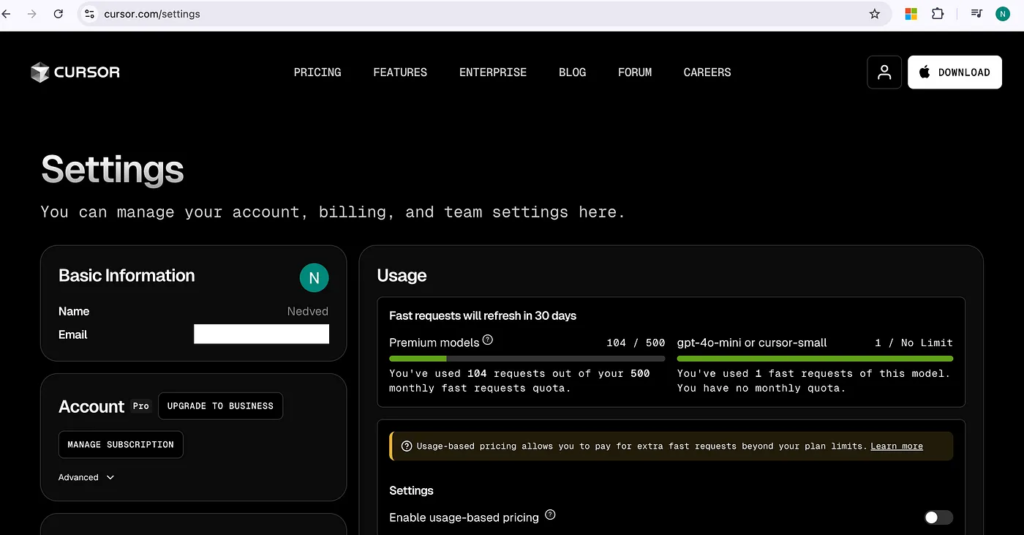
体验太好了,我直接从免费版升级到了Pro版。Cursor默认使用Claude模型,智能、响应迅速且非常高效,带来的生产力和创造力提升远超其成本。
如果未来Cursor能直接在RunPod的Pod中运行,那将真正打通最后一公里——从起草到GPU节点上执行,全部一站式完成。
这种体验反映了开发者与基础设施互动方式的深层变化,使得开发和部署变得更加流畅、迭代和直觉化。
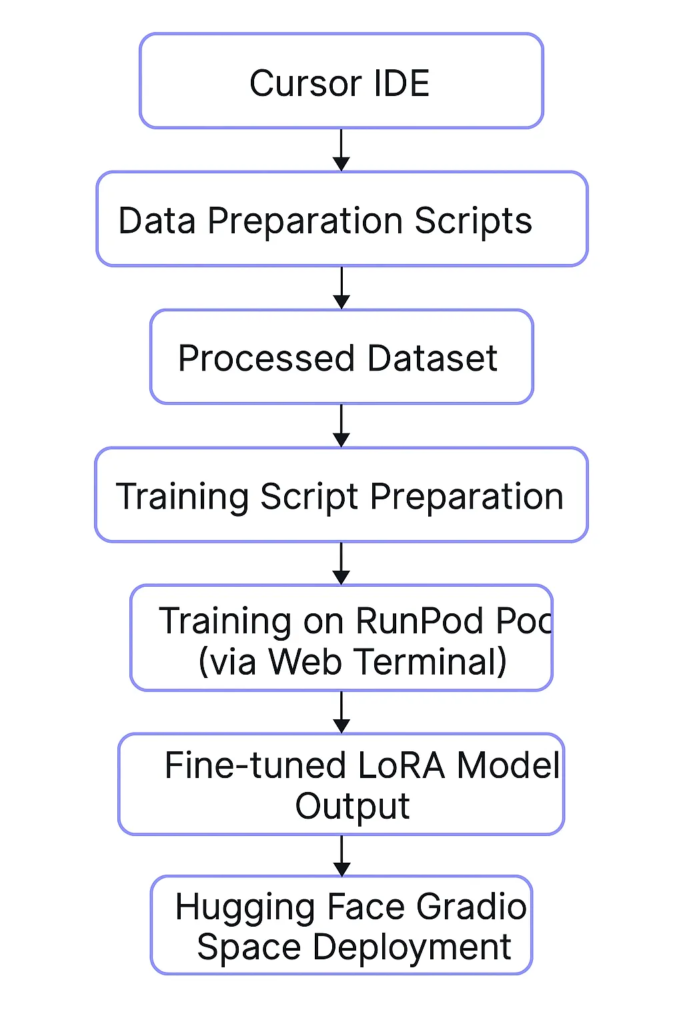
项目结构
为了规范微调流程,我设计了以下清晰的文件夹结构:
bashCopyEditpsle-finetune-pipeline/
├── configs/                    # 配置文件
│   ├── lora_config.json
│   └── train_config.json
├── data/                       # 数据文件
│   ├── raw/
│   ├── processed/
│   └── eval/
├── outputs/                    # 微调后保存的适配器检查点
├── scripts/                    # 脚本文件
│   ├── prepare_data.py
│   ├── train_lora.py
│   ├── push_to_hub.py
│   └── utils.py
├── .env.template                # 环境变量模板
├── requirements.txt            # 本地依赖
├── space-requirements.txt       # 部署到Hugging Face Spaces的额外依赖
├── train_request.json           # RunPod训练任务提交Payload
└── README.md                    # 项目说明文档
这个结构帮助我:
- 明确区分原始数据与处理后数据
- 灵活编辑配置文件,无需改动脚本
- 工作流模块化(数据准备、训练、部署分离)
- 为后续迁移到Hugging Face Spaces打好基础
数据准备(含中文注释版代码)
为了让DeepSeek-7B成为一个“中文辅导专家”,我们需要将原始考试题数据转换为聊天格式。
{
  "messages": [
    {"role": "system", "content": "你是老师,一名有20年经验的小学华文教师..."},
    {"role": "user", "content": "Q1: 请选出画线词语的汉语拼音..."},
    {"role": "assistant", "content": "正确答案是:(1)。解释如下..."}
  ]
}
这里是用于数据准备的完整脚本(带详细中文注释):
prepare_data.py
import os
import json
import glob
import pandas as pd
from tqdm import tqdm
from pathlib import Path
from typing import Dict, List, Union
import re
SYSTEM_PROMPT = “””你是一名经验丰富、耐心、擅长鼓励学生的中文教师..。”””
def load_raw_data(raw_data_dir):
“””Load raw data from JSON files in the specified directory.”””
data = []
for file_path in glob.glob(os.path.join(raw_data_dir, “*.json”)):
try:
with open(file_path, ‘r’, encoding=’utf-8′) as f:
content = f.read()
last_bracket = content.rindex(‘]’)
file_data = json.loads(content[:last_bracket+1])
if isinstance(file_data, list):
data.extend(file_data)
else:
data.append(file_data)
except (json.JSONDecodeError, ValueError) as e:
print(f”Error reading {file_path}: {str(e)}”)
continue
return data
def clean_answer(answer):
“””Clean the answer string by extracting just the option number.”””
if isinstance(answer, str):
match = re.search(r’\((\d+)\)’, answer)
if match:
return f”({match.group(1)})”
return answer
elif isinstance(answer, list):
return [clean_answer(a) for a in answer]
return answer
def format_mcq(question_data):
“””Format multiple choice questions.”””
question = question_data[“question”]
options = question_data.get(“options”, {})
answer = clean_answer(question_data[“answer”])
if isinstance(options, dict):
options_text = “\n”.join(f”{k}. {v}” for k, v in options.items())
elif isinstance(options, list):
options_text = “\n”.join(f”{i+1}. {opt}” for i, opt in enumerate(options))
else:
options_text = “”
formatted_question = f”{question}\n\n{options_text}”
formatted_answer = f”正确答案是{answer}。请参考解析并多加练习,相信你一定会不断进步!”
return formatted_question, formatted_answer
def format_short_answer(question: Dict) -> str:
“””Format short answer question.”””
return f”请回答以下问题:\n\n{question[‘question’]}”
def format_passage_question(question: Dict) -> str:
“””Format passage-based question.”””
if “passage” in question:
return f”请阅读以下文章并回答问题:\n\n{question[‘passage’]}\n\n问题:{question[‘question’]}”
return f”请回答以下问题:\n\n{question[‘question’]}”
def format_dialogue_question(question: Dict) -> str:
“””Format dialogue completion question.”””
dialogue_text = “\n”.join([f”{line[‘speaker’]}: {line[‘line’]}” for line in question[“dialogue”]])
return f”请完成以下对话:\n\n{dialogue_text}”
def create_chat_format(question: str, answer: str) -> List[Dict]:
“””Create chat format messages.”””
return [
{
“role”: “system”,
“content”: SYSTEM_PROMPT
},
{
“role”: “user”,
“content”: question
},
{
“role”: “assistant”,
“content”: answer
}
]
def format_answer(answer: Union[str, List[str]], question_type: str) -> str:
“””Format answer with explanation and encouragement.”””
if isinstance(answer, list):
answer_text = “, “.join(answer)
else:
answer_text = answer
if question_type == “multiple_choice”:
explanation = f”\n\n正确答案是:{answer_text}\n\n解析:…”
elif question_type == “short_answer”:
explanation = f”\n\n答案:{answer_text}\n\n解析:…”
elif question_type == “passage”:
explanation = f”\n\n答案:{answer_text}\n\n根据文章内容推断得出。”
else:
explanation = f”\n\n答案:{answer_text}”
encouragement = “\n\n继续努力,相信你一定能不断提升中文水平!”
return explanation + encouragement
def convert_to_instruction_format(raw_data: List[Dict]) -> List[Dict]:
“””Convert raw data to instruction format.”””
processed_data = []
for item in tqdm(raw_data, desc=”Processing data”):
if “options” in item:
question_type = “multiple_choice”
formatted_question, formatted_answer = format_mcq(item)
elif “dialogue” in item:
question_type = “dialogue”
formatted_question = format_dialogue_question(item)
formatted_answer = format_answer(item[“answer”], question_type)
elif “passage” in item:
question_type = “passage”
formatted_question = format_passage_question(item)
formatted_answer = format_answer(item[“answer”], question_type)
else:
question_type = “short_answer”
formatted_question = format_short_answer(item)
formatted_answer = format_answer(item[“answer”], question_type)
messages = create_chat_format(formatted_question, formatted_answer)
processed_data.append({
“messages”: messages
})
return processed_data
def save_jsonl(data: List[Dict], output_path: str):
“””Save data in JSONL format.”””
with open(output_path, “w”, encoding=”utf-8″) as f:
for item in data:
f.write(json.dumps(item, ensure_ascii=False) + “\n”)
def split_train_eval(data: List[Dict], eval_ratio: float = 0.1):
“””Split data into training and evaluation sets.”””
split_idx = int(len(data) * (1 – eval_ratio))
return data[:split_idx], data[split_idx:]
def main():
Path(“data/processed”).mkdir(parents=True, exist_ok=True)
Path(“data/eval”).mkdir(parents=True, exist_ok=True)
raw_data = load_raw_data(“data/raw”)
processed_data = convert_to_instruction_format(raw_data)
train_data, eval_data = split_train_eval(processed_data)
save_jsonl(train_data, “data/processed/train.jsonl”)
save_jsonl(eval_data, “data/eval/eval.jsonl”)
print(f”Processed {len(train_data)} training examples and {len(eval_data)} evaluation examples”)
if __name__ == “__main__”:
main()
完成后,生成了标准化的训练集(train.jsonl)和验证集(eval.jsonl),总数据量约411条样本。
在RunPod上用QLoRA进行微调
我在RunPod创建了一个Dedicated Pod(独享GPU服务器),搭载RTX A5000。
使用了transformers、peft、bitsandbytes三个主要库来进行训练。
# Training arguments
training_args = TrainingArguments(
output_dir=train_config['output_dir'],
num_train_epochs=train_config['num_train_epochs'],
per_device_train_batch_size=train_config['per_device_train_batch_size'],
gradient_accumulation_steps=train_config['gradient_accumulation_steps'],
learning_rate=train_config['learning_rate'],
fp16=train_config['fp16'],
logging_steps=train_config['logging_steps'],
save_steps=train_config['save_steps'],
warmup_ratio=train_config['warmup_ratio'],
lr_scheduler_type=train_config['lr_scheduler_type'],
weight_decay=train_config['weight_decay'],
optim=train_config['optim'],
max_grad_norm=train_config.get('max_grad_norm', 0.3),
gradient_checkpointing=train_config.get('gradient_checkpointing', False),
seed=train_config['seed']
)

# Initialize Trainer
trainer = CustomTrainer(
model=model,
args=training_args,
train_dataset=tokenized_dataset["train"],
data_collator=DataCollatorForSeq2Seq(
tokenizer,
pad_to_multiple_of=8,
return_tensors="pt",
padding=True
),
)

# Start training
print("Starting training...")
trainer.train()

# Save the final model
trainer.save_model()

if __name__ == "__main__":
main()由于DeepSeek-7B模型巨大(7B参数),即使采用4位量化后,也需要大约16GB-20GB VRAM来稳定完成训练。最终,A5000的24GB VRAM带来了足够的裕度,训练过程流畅,没有出现OOM错误。

训练过程中的loss变化曲线如下:
| Epoch | Loss |
|---|---|
| 0.39 | 3.97 |
| 0.78 | 2.02 |
| 1.17 | 0.50 |
| 1.56 | 0.22 |
| 结束时平均 | ~0.97 |
整个微调耗时约29分钟,总成本不到1美元!
部署到 Hugging Face Spaces
训练完成后,我将LoRA适配器上传到Hugging Face Hub。
同时,基于第一部分创建的Gradio应用,修改了app.py和requirements.txt,切换到了微调后的模型。
app.py
bit=True,
                bnb_4bit_quant_type="nf4",
                bnb_4bit_compute_dtype=torch.float16,
                bnb_4bit_use_double_quant=True
            )

            # Load base model with 4-bit quantization
            log("🔄 Loading base model with 4-bit quantization...")
            base_model = AutoModelForCausalLM.from_pretrained(
                model_id,
                quantization_config=bnb_config,
                device_map="auto",
                trust_remote_code=True
            )
            log("✅ Base model loaded")

            # Load LoRA adapter
            log("🔄 Loading LoRA adapter...")
            self.model = PeftModel.from_pretrained(
                base_model,
                adapter_id,
                device_map="auto",
                torch_dtype=torch.float16
            )
            log("✅ LoRA adapter loaded")

            # Set to evaluation mode
            self.model.eval()
            log("✅ Model set to evaluation mode")

            if torch.cuda.is_available():
                torch.cuda.empty_cache()
                log("✅ CUDA cache cleared")

        except Exception as e:
            log(f"⚠️ Model loading failed: {e}")
            log(f"Detailed error: {traceback.format_exc()}")
            raise e

# System prompt
SYSTEM_PROMPT = """xxxxxx。"""

def test_model():
    test_input = "你好,请问你是谁?"
    log("🔄 Testing model with basic input...")
    try:
        response = respond(test_input, [])
        log(f"Test response: {response[:100]}...")
        if "Django" in response or "Python" in response or response.strip() == "":
            log("⚠️ Warning: Model may not be properly loaded - response seems incorrect")
            return False
        return True
    except Exception as e:
        log(f"⚠️ Model test failed: {e}")
        return False

@spaces.GPU(duration=60)
def respond(message, history):
    try:
        # Format prompt with chat template
        prompt = f"""<|system|>
{SYSTEM_PROMPT}
</|system|>
<|user|>
{message}
</|user|>
<|assistant|>
我是老师,让我来回答你的问题。
"""

        log(f"🟢 Processing: {message[:40]}…")

        if zhanglaoshi.model is None:
            log("🔴 Model is not loaded!")
            return "系统繁忙,模型未加载成功,请联系管理员。"

        # Tokenize input
        inputs = zhanglaoshi.tokenizer(
            prompt,
            return_tensors="pt",
            truncation=True,
            max_length=2048,
            add_special_tokens=True,
            padding=True
        )

        # Move inputs to GPU if available
        inputs = {k: v.to(zhanglaoshi.device) for k, v in inputs.items()}

        # Generate response
        with torch.inference_mode():
            try:
                outputs = zhanglaoshi.model.generate(
                    **inputs,
                    max_new_tokens=512,
                    do_sample=True,
                    temperature=0.7,
                    top_p=0.9,
                    top_k=50,
                    repetition_penalty=1.1,
                    pad_token_id=zhanglaoshi.tokenizer.pad_token_id,
                    eos_token_id=zhanglaoshi.tokenizer.eos_token_id,
                    num_return_sequences=1
                )

                # Move outputs to CPU for decoding
                outputs = outputs.cpu()

                # Decode only the new tokens
                response_tokens = outputs[0][inputs["input_ids"].shape[-1]:]
                text = zhanglaoshi.tokenizer.decode(
                    response_tokens,
                    skip_special_tokens=True,
                    clean_up_tokenization_spaces=True
                ).strip()

                # Filter out irrelevant responses
                if any(x in text.lower() for x in ["python", "django", "how to", "log in as admin"]):
                    return "对不起,我现在无法正确回答你的问题。请稍后再试。"

                return text

            except Exception as e:
                log(f"🔴 Generation error: {str(e)}")
                log(f"Detailed error: {traceback.format_exc()}")
                return "生成回答时出错,请稍后再试"

    except Exception as e:
        log(f"🔴 Processing error: {str(e)}")
        log(f"Detailed error: {traceback.format_exc()}")
        return "系统繁忙,请稍后再试"

# Initialize model
log("Initializing ModelWrapper...")
zhanglaoshi = ModelWrapper()
zhanglaoshi.load()
log("Model loading completed")

# Test model
if not test_model():
    log("⚠️ Model verification failed - please check configuration")

# Gradio interface
demo = gr.ChatInterface(
    respond,
    title="Zhang Laoshi – PSLE Chinese Tutor (Fine-tuned)",
    description="学习助手(基于DeepSeek-7B微调优化版本)",
    examples=["如何提高作文水平?", "考试要注意什么?"]
)

if __name__ == "__main__":
    demo.launch(server_name="0.0.0.0", server_port=7860)
最终部署成功,直接在Hugging Face Spaces上用GPU实例运行。
反思与未来计划
这次极客实验不仅仅是微调一只模型,而是亲身体验了开发AI应用新方式的变革:
- Cursor加速了代码起草与调试
- RunPod提供了灵活且低价的GPU计算
- Hugging Face Spaces使部署几乎无门槛
未来计划包括:
- 让Cursor直接连接RunPod Pods,无需手动操作
- 扩充训练数据,如更多写作、阅读练习数据
- 对比LoRA和Prefix-Tuning的实际效果
- 在推理阶段进一步优化批处理和成本
结语
亲手看到自己训练出的中文辅导机器人流畅回答问题,那一刻的成就感,简直无可替代!
探索仍在继续,期待下一次极客冒险!
🎉 Happy coding and have fun!